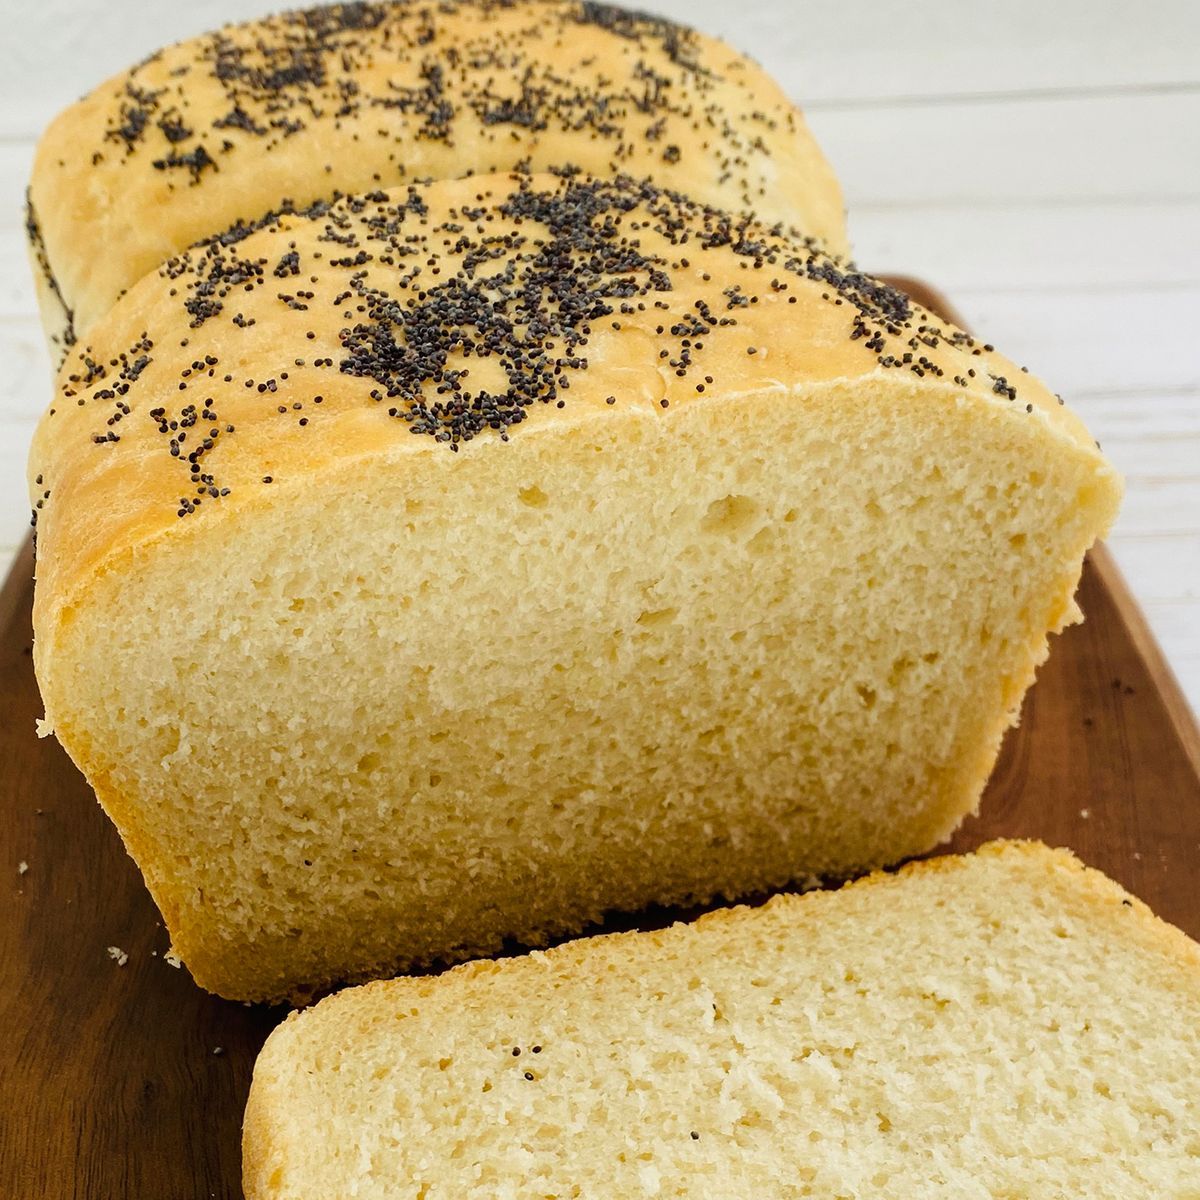
Basic white bread recipe
Our classic recipe for basic white bread produces a light and fluffy interior with a chewy golden crust. Serve fresh from the oven slathered with butter.
This is it. The recipe that takes you by the hand and leads you through the process of baking your own bread. Whether a novice or an old hand this recipe produces the real deal, fluffy white bread with a slightly chewy crust. Eat fresh from the oven with butter and jam, make little finger sandwiches or use the day-old bread for cheese toasties.
No special equipment is needed for homemade bread. There’s no denying that a stand mixer helps but all you need is a hot oven and a bit of elbow grease. The dough has been kneaded enough when it looks smooth and when you poke your finger into it the hole it fills back quickly. You could also do what is known as the ‘pane test’. To do this, take a small amount of dough and slowly stretch it until the piece is so thin in the middle you can see light through it. I find this the most satisfying way of knowing your hard work has paid off.
Don’t be put off by how many steps this basic white bread recipe has. We’ve done this deliberately to put as much information as we can.
What do I need for the perfect loaf of white bread?
Yeast is at the heart of this white bread recipe. We say to use dried yeast, but instant dried yeast can be substituted. Ironically using instant yeast means the bread takes longer to prove, but as we set the dough aside for between 45-75 minutes, we leave room for the time lag. Look for high protein plain flour – this will be labelled as bread and pizza flour. High protein means high gluten, which makes the bread stronger and able to hold more carbon dioxide which is responsible for the rising. The lactic acid in milk helps tenderise the crumb and the natural sugar adds flavour and contributes to the golden crust. When making homemade bread, the water needs to just be luke-warm. Too hot and it may kill the yeast, it needs to be just warm enough to help activate the yeast.
Now that you have your baker’s hat firmly on your head, how about venturing out to other types of bread making. From buttery brioche, to sourdough and focaccia and classic pizza bases.
Additional recipe notes by Alison Adams - Food Writer and Recipe Tester.
Ingredients
- Melted butter
for greasing and brushing
- 500g plain flour
3 1/3 cups
- 2 tspyeast
- 2 ⅜gm salt
- 375mls lukewarm water
1 1/2 cups
- Extra water
for brushing
- 1 tsppoppy seeds
for sprinkling
Directions
- 1
Brush a 10 x 20cm (base measurement) loaf pan with the melted butter to lightly grease. Measure all your ingredients. Yeast plays an important role in bread-making. It ferments and grows when combined with "food" such as flour and/or sugar, and warmed. Carbon dioxide is produced and trapped in the dough as tiny air bubbles which make the bread rise during cooking and give it its characteristic texture. These days, dried yeast is available in sealed sachets as instant granules that can be added to the dry ingredients without first combining it with a little of the water (and sometimes flour) to activate it. The sachets are best kept in a cool, dry place. Salt is added to bread dough simply to add flavour.
- 2
Place the plain flour, yeast and salt in a large bowl and mix well to combine. Make a well in the centre and add the water to the dry ingredients. The water needs to be lukewarm to activate the yeast and encourage it to grow. If the water is too hot, it can kill the yeast. To test whether it is at the right temperature, sprinkle a little on the inside of your wrist - it shouldn't be too cold or too hot.
- 3
Use a wooden spoon to stir until combined and then use your hands to bring the dough together in the bowl.
- 4
Turn the dough onto a lightly floured surface and knead for 8-10 minutes or until smooth and elastic. Kneading distributes the yeast evenly through the dough and develops and strengthens the gluten in the flour which will form the framework of the bread. The best way to knead is to use the heel of your hand to push the dough away from you and then lift it with your fingertips and fold it over itself towards you. Turn the dough a quarter turn and repeat. You can tell when the dough has been kneaded enough by pressing your finger into the surface of the dough - if it springs back, it has been kneaded sufficiently. If the dough hasn't been kneaded enough, the resulting bread will have a holey, crumbly texture and poor structure.
- 5
Shape the dough into a ball. Brush a large bowl with the melted butter to grease. Place the dough into the bowl and turn it over to lightly coat the dough surface with the butter. This will stop the surface of the dough drying out as it stands, which can affect the rising process. Cover the bowl with plastic wrap or a damp tea towel and then place it in a warm, draught-free place to allow the dough to rise. A good place to stand it is on a wooden board on the door of the oven with the pilot light on, or in a sheltered, sunny spot. If the temperature is too high, it may kill the yeast, making the dough useless. The ideal temperature for rising bread dough is around 30°C.
- 6
Leave the dough in this spot until it is double its size. This process is known as "proving" and the time it takes will depend on where you stand the bowl and on the warmth of you kitchen. The slower the rising, the more even and close the bread texture will be. However, if the dough rises too slowly, or too rapidly, the final bread will have a less even texture and an unpleasant yeasty flavour. This quantity of bread dough should take between 45-75 minutes t double in size. When the dough is ready, it will retaining a finger imprint when lightly pressed. If left to rise for too long, the bread texture will be uneven and have large holes. If not left for long enough, it will have a heavy, dense texture.
- 7
Once the dough has doubled in size. Punch it down in the centre with your fist. This step, known as "punching" or "knocking" down the dough, release excess carbon dioxide produced by the yeast during rising so the final bread won't have a "yeasty" flavour.
- 8
Turn the dough onto a lightly floured surface and knead again for 2-3 minutes or until smooth and elastic and returned to its original size.
- 9
Preheat oven to 200°C.
- 10
Divide the dough into 2 equal portions and shape each into a smooth round. If the dough is unevenly divided and/or shaped unevenly, the final bread will be irregular in appearance. Place the portions of dough side by side in the greased loaf pan. Brush lightly with the melted butter. Stand the pan in a warm, draught-free place, as before, for about 30 minutes or until the dough has risen about 1cm about the top of the pan.
- 11
Gently brush the loaf with a little water and then sprinkle with the poppy seeds. Bake in preheated oven for 30 minutes or until golden and cooked through. The best way to tell when the loaf of bread is cooked is to tap it on the base with your knuckle - if it sounds hollow, it is cooked.
- 12
Turn the loaf immediately onto a wire rack and allow to cool. If left in the pan, the loaf will sweat and the crust will become soft.
- 13
Once cool, store the loaf in a well-ventilated place at room temperature. This bread is best eaten on the day it is made. However, it makes great toast 1-2 days later. Make any stale leftovers into breadcrumbs and freeze in a sealed freezer bag to have on hand for later use.
Basic white bread recipe
Ratings & Reviews
Be the First to Rate
Your rating helps others discover amazing recipes. Share your experience and let others know what you think!
About this Recipe
Bake the Best Basic White Bread Recipe
There's nothing quite like the aroma of freshly baked bread filling your home, and with our Basic White Bread recipe, you can enjoy that comforting experience with ease. This classic recipe is designed to guide even the most novice baker, resulting in a perfectly light and fluffy interior complemented by a delightfully chewy, golden crust. Forget complex techniques or special equipment; all you truly need is a warm oven and a little passion for homemade bread.
What makes this easy bread recipe stand out? We've stripped away the intimidation, focusing on clear steps and essential tips. We emphasize the importance of high-protein plain flour (often labeled bread or pizza flour) for its gluten content, which gives your fluffy white bread its structure and rise. And for the yeast, lukewarm water is key – just warm enough to activate it without hindering its magic.
One of our favorite tips for mastering baking bread is the 'pane test' for kneading. Gently stretch a small piece of dough; if you can see light through it without it tearing, your dough is perfectly kneaded and ready for its first rise!
Serving Suggestions:
- Enjoy slices fresh from the oven, generously slathered with butter.
- Pair with your favorite jam for a delightful breakfast or brunch.
- Create classic finger sandwiches for lunch.
- Transform day-old bread into the ultimate cheese toasties for a cozy meal.
Once you've mastered this fundamental basic white bread recipe, you'll feel confident to explore other delightful bread-making adventures, from rich brioche to rustic focaccia.